Image Map

Stampin' Up! Paper Pumpkin!

 Happy Sunday crafters!!

Today I am coming to you from sunny Florida! 🌴🌞

Are you a subscriber to Stampin' Up!'s monthly Paper Pumpkin? I love getting my Paper Pumpkin each month as sometimes I just want to sit down and craft but don't want to have to think much or do the designing myself. That is what is great about Paper Pumpkin! It's a monthly kit sent right to your door with ALL the supplies needed to create a different project each month! If you are more of an Avid crafter and don't like the project the designed, you have the ability to use the products in the box however you like! 

When you sign up for Paper Pumpkin, you can choose from a variety of subscriptions. You can pre-pay for a full year, 6 months, or do month-to-month billing. The great thing about doing pre-pay for a full year is on top of having crafting fun for a year, your order would qualify for Stampin' Rewards and you can get free products! 

So what all comes with your monthly kit? In your first month's box, you will receive a Clear Stamp Block to use with all of your future boxes. Every kit will include an EXCLUSIVE stamp set that is only available through Paper Pumpkin. You will also receive a Stampin' Spot (mini ink pad) along with embellishments and everything else you need for that project! The only thing you need to supply on your own is scissors! Each month is a new project, whether it's a set of Cards, Gift/Treat Bags or Home Decor, you'll love it! 

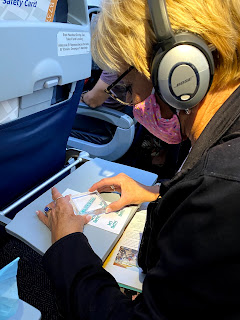
Today I brought my Paper Pumpkin on my flight to Florida. It small enough to fit in my carry-on luggage so I can get crafty on the flight. I absolutely love this month's project, it screams summer with the popsicles! I had so much fun creating these super cute cards, my mom even got in on the fun! We are going to leave a card at any restaurant we eat at for our waiters, I know if I were to receive a cute card like this from someone it would instantly put a smile on my face! 


Aren't these cards super cute?! I just love them, I hope you do too! 

Sign up today for Paper Pumpkin HERE

How to Create your own Washi Tape-Tips from Stampin' Up! CEO Sara Douglass

 Happy Friday Crafters!!


One thing that I love about being part of Stampin' Up! is having an amazing CEO who loves to create and use our products as much as we do! Sara Douglass is the daughter of the Co-Founder, Shelli Gardner. I have personally met both Sara and Shelli during Stampin' Up! Events and they are some of the most genuine and nicest people I have ever met. Here is a picture from the last in-person event I attended with friends and teammates where we celebrated Stampin' Up! 30th anniversary! 

Sara often goes live on her Facebook Page to share some of her creations and I wanted to share one of her more recent Live's with you! She comes up with very clever tips & tricks to use the most out of the products we offer and this idea is pure genius in my mind! 

Most of us crafters LOVE Washi Tape but sometimes we can be limited with the designs we are able to purchase. Well, fear no more! Sara has come up with a way to make your own Washi Tape using just a few items. By doing this, we can use items we already have in our stash and create even more customization to our creations!

The materials you will need are the following: Tissue Paper (what you use in gift bags), Stampin' Up! Adhesive Sheets (Item #152334), Stamp & Ink of your choice. That's it!! Your first step is going to be cutting the tissue paper to a manageable size, such as 6X6. Next, cut your adhesive sheet to the same size. Sara provides a great tip in her video; peel just a corner of the adhesive sheet and line up your tissue paper, stick it to the corner you peeled back. This will make your adhesive sheet line up with your tissue paper and help avoid any wrinkles. After you have your corner stuck on, you can then pull the rest of the backing for the adhesive sheet and gradually stick the rest of the tissue paper to the adhesive. Once you have the tissue paper attached to the adhesive sheet, you can start creating! Use any stamp set and ink you want for your desired project and create a pattern! Next, trim the sheet down to the width you want your washi tape. All that is left is adding it to your project, simple as that!! 

I love when I see new techniques in how to use our products to get the most use out of them, I think this is a great way to use up adhesive sheets that you have leftover from larger projects. I don't know about you but I save all of my scraps and don't like to waste any product! 

Check out Sara's Facebook Live video HERE to see this in action and don't forget to "Like" her Facebook page! She goes Live with so many amazing projects and tips like the one I am sharing with you today. 

Have you tried this technique? If so I would LOVE to see what you have done with it. If you haven't, give it a try and tag me so I can see your creation!! 

Stampin' Up! 2021-2022 Annual Catalog Preorder Unboxing!


Hello Crafters!  

It feels so good to be back posting on my website, I've missed crafting and showing you the awesome products with Stampin' Up! I have a lot of fun stuff planned for the rest of the year as I am on a new life adventure going back to school and starting a new job soon! 

Today I have a FUN unboxing video for you! You'll notice how excited I get when opening up some of the brand new product, I didn't get a chance to look at everything before filming and I loved that I captured my raw reaction!! I am so so excited to start playing with the product I showed you. I placed another pre-order and hope that will arrive next week so I can show you those new goodies too! Hope you enjoy the video! :) 

Also, don't forget about the Clearance Rack, there are some really good deals in there right now. I stocked up on the Tins, Ribbon, and Mini Coffee Carriers, everything is while supplies last so make sure you don't miss out before they are gone!! Shop Clearance Rack here!

                                                                                                                                                        Image Copyright Stampin' Up!

Thanks so much for visiting my website, I cant wait to get back into the routine of posting weekly videos and tutorials for you! Don't forget to Subscribe to my YouTube channel and website so you can stay up to date on all my projects and videos!